In this tutorial we will show how to connect ESP8266 WiFi module and 5V Arduino. Since ESP8266 is not 5V tolerant we need some kind of voltage level shifter.

ESP8266 module is not 5V tolerant. It works on 3.3V power suplay. Most Arduinos works on 5V. If we want connect both components we need to adapt voltage levels between. If you are using 3.3V Arduino, then read ESP8266 WiFi and 3.3V Arduino connection.

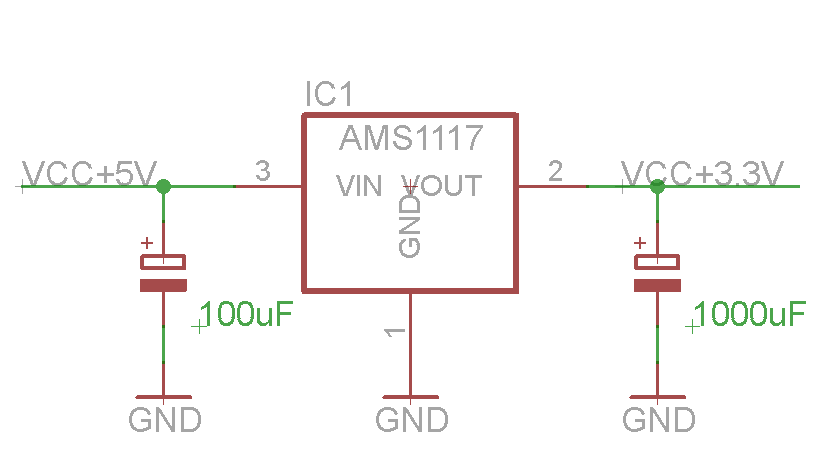
First we need 3.3V power supply for ESP8266. Good choice for regulator is AMS1117 3.3V. Simple circuit is shown below. Be sure to use big enough capacitor.

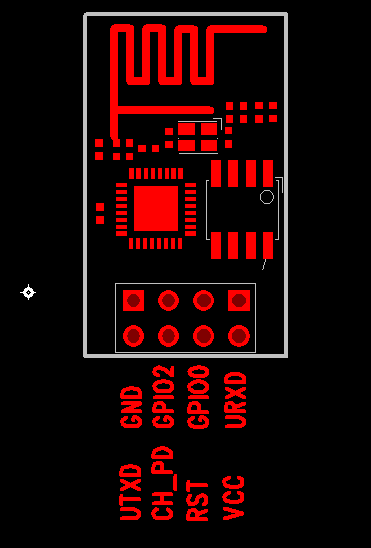
ESP8266 VCC and CH_PHD are connected to 3.3V power supply.

ESP8266 pinout


AMS1117 3.3V power supply.

 AMS117 3.3V power supply

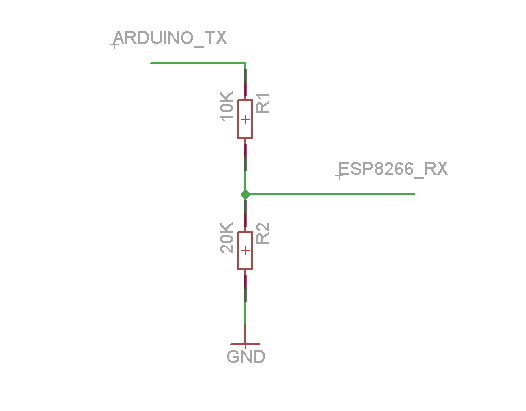
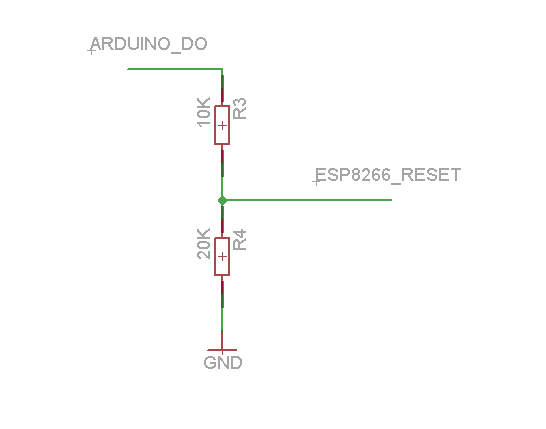
Next we need shift voltage levels on data lines. To convert 5V output to 3.3V input level we can use simple resistor divider. In this circuit we use 20K and 10K resistors. With this level shifter we can connect Arduino TX to ESP8266 RX and Arduino digital pin and ESP8266 reset pin.


Arduino TX -> ESP8266 RX

Arduino TX, ESP8266 RX 

Arduino DO pin -> ESP8266 reset

Arduino DO - > ESP8266 reset


To connect Arduino RX and ESP8266 TX you may try without level shifter. 3.3V should be enough for logical one in 5V Arduino.  Just connect Arduino RX and ESP TX pin. If that doesn't work use level shifter.

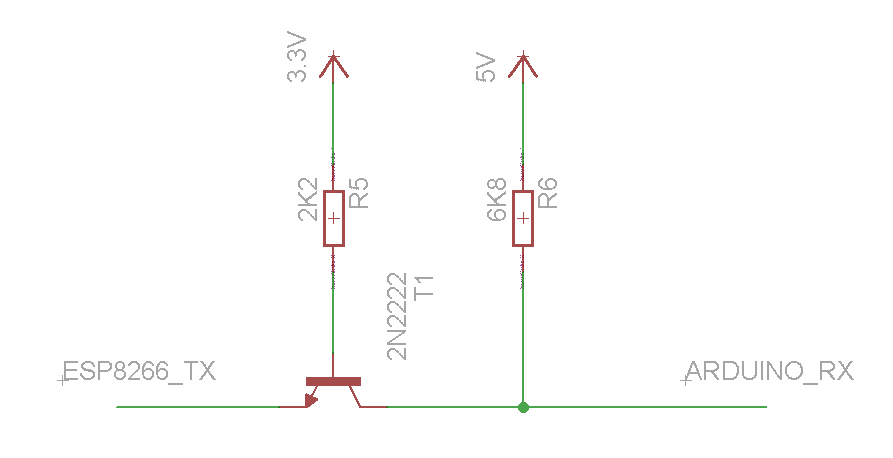
For level shifter we need active component. In circuit below we use NPN transistor 2N2222 and two resistors. This level shifter is suitable to connect Arduino RX and ESP8266 TX pin.


Arduino Mega 2560 with TFT shield and ESP8266 module. Arduino Mega 2560 is 5V and ESP8266 is 3.3V.


See more tutorials at ​http://iot-playground.com/build​


Buying guide


To support this site and EasyIoT framework development please buy in our store.

Arduino Mega 2560

For bigger Arduino projects.

5V 16Mhz Arduino Pro Mini

Small but powerful suitable for most DIY Arduino projects.

10Pcs AMS1117-3.3 LM1117 3.3V 1A SOT-223 Voltage Regulator

3.3V voltage regulator,

100Pcs NPN Transistor TO-92 2N2222

All purpose NPN transistor.

400X 0.25w 1/4w Metal Film Resistor Pack Kit 1% 20 Value Each 20 Pcs 10 ~ 1M ohm

210Pcs 25 Value 0.1uF-220uF Electrolytic Capacitors Assortment Kit Set

FT232RL FTDI USB to TTL Serial Adapter 5V, 3.3V

FT232RL FTDI USB for Arduino or ESP8266 programming. Support 5V and 3.3V

5V 2A Charger Micro USB

For Raspberry Pi or sensor modules, cheap and easy power solution.

ESP8266 ESP-01 Serial WIFI Wireless Transceiver Module

ESP8266 Serial WIFI Wireless Transceiver Module

ESP8266 ESP-03 Serial WIFI Wireless Transceiver Module

ESP8266 serial WIFI model ESP-03

ESP8266 ESP-12 Serial WIFI Wireless Transceiver Module

ESP8266 serial Port WIFI wireless module ESP-12

ESP8266 ESP-05 Serial WIFI Wireless Transceiver Module

ESP8266 ESP-05 Serial WIFI Wireless Transceiver Module


Comments   

#9 Super User 2015-07-15 16:14
Quoting ChrizZz:
Hi great work - but which Pin is the "Arduino_DO" ?
Thanks in Advance.


Any Arduino DO pin. If you have more questions please join community forum.
#8 ChrizZz 2015-07-14 17:09
Hi, great work - but which Pin is meant with "Arduion_DO" ?
Thank you in advance.
#7 Super User 2015-06-30 16:28
Quoting Niall:
Hi,

Thanks for very helpful post.

I have powered ESP8266 directly from Arduino Mega 3.3v pin. Also using Adadruit tft touch shield.
Everything seems to work fine for about three web requests. Then Arduino hangs and I need to reset.
I've noticed the Arduino gets hot around the power connector (I'm using 12V psu for Vin).
Does this mean I need to make the regulator with AMS1117 that you have described above?
Thanks.


Please join community forum and ask questions there. Maybe some other user has similar problem.
#6 Niall 2015-06-28 09:17
Hi,

Thanks for very helpful post.

I have powered ESP8266 directly from Arduino Mega 3.3v pin. Also using Adadruit tft touch shield.
Everything seems to work fine for about three web requests. Then Arduino hangs and I need to reset.
I've noticed the Arduino gets hot around the power connector (I'm using 12V psu for Vin).
Does this mean I need to make the regulator with AMS1117 that you have described above?
Thanks.
#5 Super User 2015-04-12 23:45
Quoting rinozen:
hi.. about 3.3v to 5v tx/rx schematic.. there are only positif supply on 3,3v and 5v.. where is the ground connection? im confusing.. plz help me.. :'(


Ground is common to 3.3V and 5V and connected to GND pin on ESP.
#4 rinozen 2015-04-11 15:26
hi.. about 3.3v to 5v tx/rx schematic.. there are only positif supply on 3,3v and 5v.. where is the ground connection? im confusing.. plz help me.. :'(
+1 #3 Super User 2015-04-04 09:14
Quoting Carlo:
Hi, great work but I miss the part where pair the ESP8266 to my Access Point to join the network where my raspberry is linked to.

This is described in other articles.
#2 Carlo 2015-04-03 23:07
Hi, great work but I miss the part where pair the ESP8266 to my Access Point to join the network where my raspberry is linked to.
+1 #1 DarioCdj 2015-02-23 14:55
It works also without 2n2222

You have no rights to post comments

Forum latest

  • No posts to display.