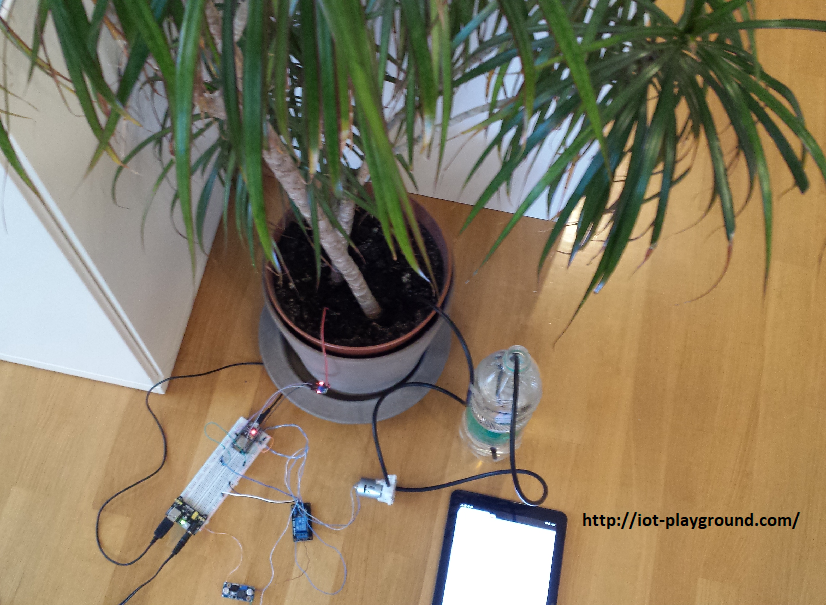
In this tutorial we will show how to build plant irrigation system with ESP8266 and EasyIoT Cloud. With web interface we can control water pump and soil moisture remotely. Now you can go on holiday and irrigate plant with your phone.
Contents
3. EasyIoT Cloud configuration
Introduction
Irrigation system features:
- remotely controlled water pump
- automatic irrigation if soil moisture is low
- automatic / manual mode
- soil moisture and water pump status display
- log soil moisture historical values
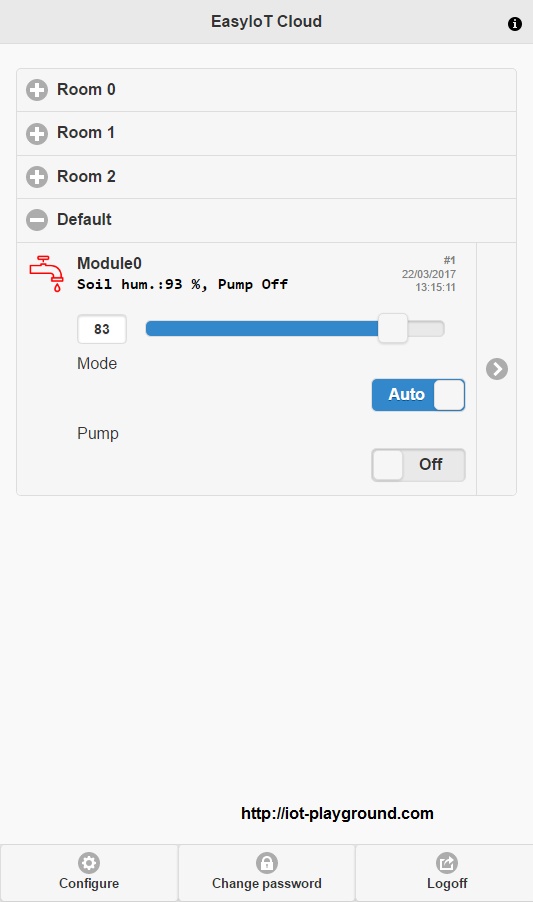
Irrigation can be triggered in WEB user interface. It this case pump will start for 10s. You can also use automatic mode. In this case you set threshold soil moisture in WEB interface. If soil moisture drops below this value pump will switch on for 10s. After 10 min will again check soil moisture and switch pump on if needed.
EasyIoT Cloud user interface.
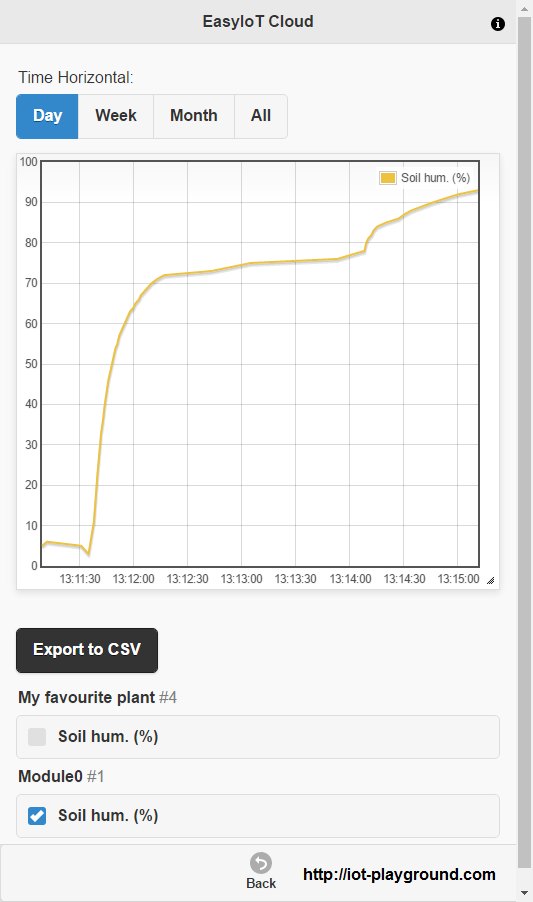
Soil moisture historical values.
Materials
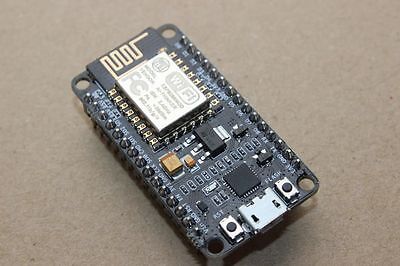
-ESP8266 module
| ESP8266 Lua Nodemcu WIFI Network Development Board | |
$7.43  |
-water pump
| DC 3-9V Spray Pumping Motor | |
| $3.53 |
-soil moisture sensor module
| Soil Humidity Hygrometer Moisture Detection Sensor | |
| $1.03 |
-regulator module 0-30V
| Step-Down Adjustable Converter Power Module Regulator LM2596 | |
| $0.99 |
-12V power supply
| 12V 1A/2A Transformer Travel Power Supply Adapter US EU UK Plug | |
| $1.38 |
-2N2222 NPN transistor
| 100Pcs NPN Transistor TO-92 2N2222 | |
| $1.01 |
-MB102 Breadboard
| MB102 Breadboard Power Supply Module 3.3V 5V Arduino Board+Breadboard 830 Point | |
| $3.12 |
-5K resistor
| 400X 0.25w 1/4w Metal Film Resistor Pack Kit 1% 20 Value Each 20 Pcs 10 ~ 1M ohm | |
| $1.88 |
See buying guide at the end of tutorial.
EasyIoT Cloud configuration
Register to EasyIoT Cloud service. We will need custom module type for irrigation system. Follow EasyIoT Cloud module configuration tutorial to add new ZMT_IRRIGATOR module type.
Program
Program is written in ESP8266 Arduino IDE. It uses ESP8266 MQTT EasyIoT Cloud library to communicate and configure EasyIoT Cloud. Program can be downloaded from our GitHub.
In program change following lines:
#define AP_SSID "xxx"#define AP_PASSWORD "xxx"
#define EIOTCLOUD_USERNAME "xxx"#define EIOTCLOUD_PASSWORD "xxx"
In first two lines set access point name and password, then set EasyIoT Cloud username and password. Then upload program to ESP8266 NodeMCU. You can also use different type of ESP8266 - then you need additional power supply and FDTI USB adapter.
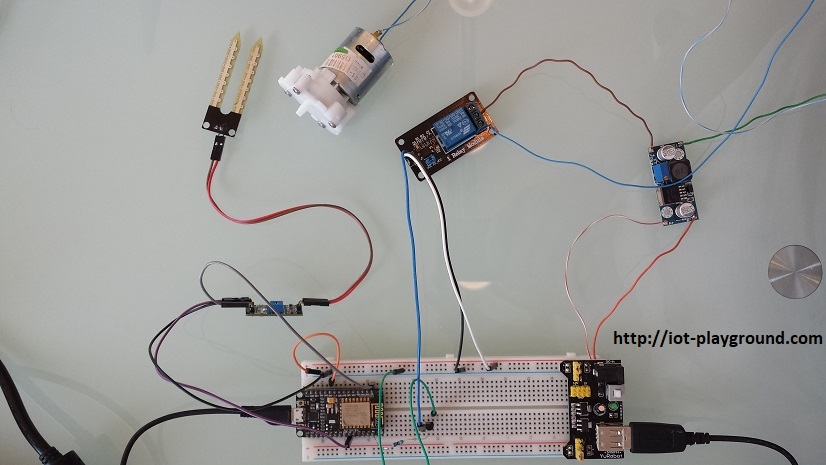
Hardware
For the sake of simplicity we will use ESP8266 NodeMCU. You can user any other ESP8266 type with additional 3.3V power supply.
Connecting soil moisture sensor
Use ESP8266 3.3 V power supply to power soil moisture sensor module. This means that you connect ESP8266 3.3V to VCC on sensor and ESP8266 GND with sensor GND. Then connect soil moisture sensor analog output (mark AO) to analog input on ESP8266 board A0. Leve DO on soil moisture sensor unconnected.
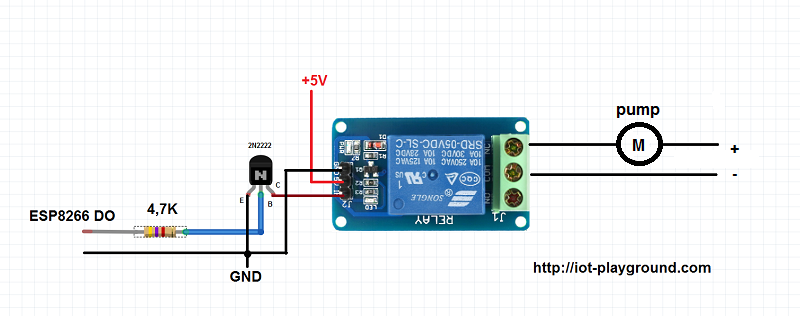
Connecting water pump motor to ESP8266
To connect water pump motor we will need relay module. Because relay module uses 5V power supply and ESP8266 uses 3.3V power supply we will add transistor to drive 5V relay with 3.3V. Transistor is connected to ESP8266 D0 pin trough resistor. If you connect relay directly to ESP8266 you will fry ESP8266. Other side of relay is connected to motor pump and adjustable power supply. Set voltage of motor pump between 6 and 9V.
Connecting manual button
If you are using ESP8266 NodeMCU you can use on board flash button to manually switch on and off motor pump. If you are using other type of ESP8266 then use 10K resistor one side connected to 3.3V and other side to D3 pin. Then connect D3 to GND trough push button.
See more tutorials at http://iot-playground.com/build
Buying guide
To support this site and EasyIoT framework development please buy in our store.


Comments
Thank you! That totally worked!
Try to select NodeMCU board instead of Generic ESP8266 Module in Arduino IDE.
I re-download> I delete the old library> I add the new library> I compile fixed the same error
I see from the folder: libraries> esp mqtt> src> Mqtt> and I find mqtt.h and mqtt.c (is this what it means)
Finish i uninstall arduino ide and normal
This is part of the error message:
Arduino: 1.8.3 (Windows 10), Board: "Generic ESP8266 Module, 80 MHz, 40MHz, DIO, 115200, 512K (64K SPIFFS), ck, Disabled, None"
C:sketch.ino: In function 'void setup()':
esp8266_soil_moisture_pump:21: error: 'D3' was not declared in this scope
#define PIN_BUTTON D3 // nodemcu flash button
^
sketch.ino:91:11: note: in expansion of macro 'PIN_BUTTON'
pinMode(PIN_BUTTON, INPUT);
^
sketch.ino: In function 'void loop()':
esp8266_soil_moisture_pump:21: error: 'D3' was not declared in this scope
#define PIN_BUTTON D3 // nodemcu flash button
I re-download> I delete the old library> I add the new library> I compile fixed the same error
I see from the folder: libraries> esp mqtt> src> Mqtt> and I find mqtt.h and mqtt.c (is this what it means)
Please help me
Use latest version of MQTT library. Do you see function SetModuleType in MQTT.cpp?
RSS feed for comments to this post