- Posts: 55
- Thank you received: 6
Infrared transmitter & Door/Window sensor
11 years 2 months ago - 11 years 2 months ago #1660
by lesjaw
Infrared transmitter & Door/Window sensor was created by lesjaw
so here i go..finally I made my infrared remote IoT.. ")
the code still so messy..
i use arduino pro mini & esp8266..
in esp8266 i'm running Door/Windows sensor using bb-05 module, and the connection to EasyIoT server also inside esp8266
here is the code in esp8266 :
once it connected, make a note of ts IP Address, we will need it for the automation code
and now the code inside arduino pro mini :
you must change the IRsend command according to your own TV/Sound/AC.. i was using IRREcvDump to see my irsend for samsung tv..
and now on EasyIoT server side..
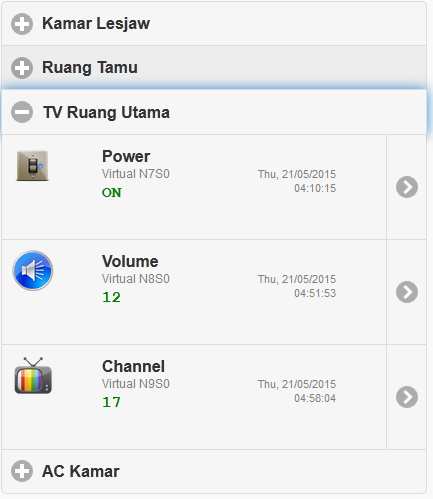
add a virtual node for Door/Window sensor, set it as Door/window(DI)
add a virtual node for Power ON/Off TV, set it as Digital Output(DO)
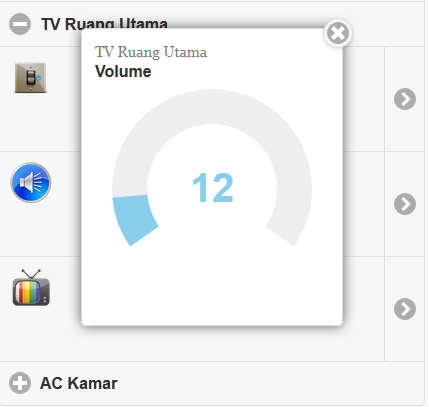
add a virtual node for Volume TV, set it as Analog Output(AO)
add a virtual node for Channel TV, set it as Analog Output(AO)
i choose DO and AO because in current version of EasyIot server we still dont have the correct interface for TV Power, Volume and Channel.. so we use them for now until there is an update for them") .. i really hope Mr EasyIoT will support this..
.. i really hope Mr EasyIoT will support this..
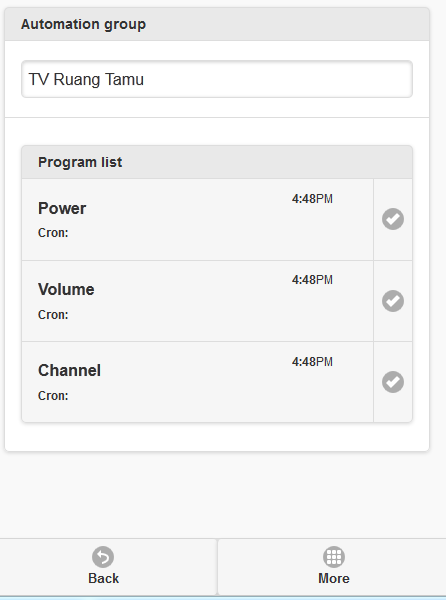
Next we create automation for TV Power, Volume and Channel
here is the automation code for TV Power
this will send value of on/off to node as 1:1&, which mean 1 for id of power, : is separator, 1 is the value, and & the closing value..
here is the automation code for TV Volume
same as TV Power code data sent, this will send value of Volume to node as 2:?&, which mean 2 for id of volume, : is separator, ? is the dynamic value according to interface slider, and & the closing value..
and last is Channel automation code, basically its just the same as volume automation code..
but we change the id of the data we send..
because the lack of no feedback from the TV, the status of our interface will never be the same, example : perhaps the volume of the tv show us 10 but in our interface it show 13..
well then until we got the right web interface so this is will just do fine..")

schematic..
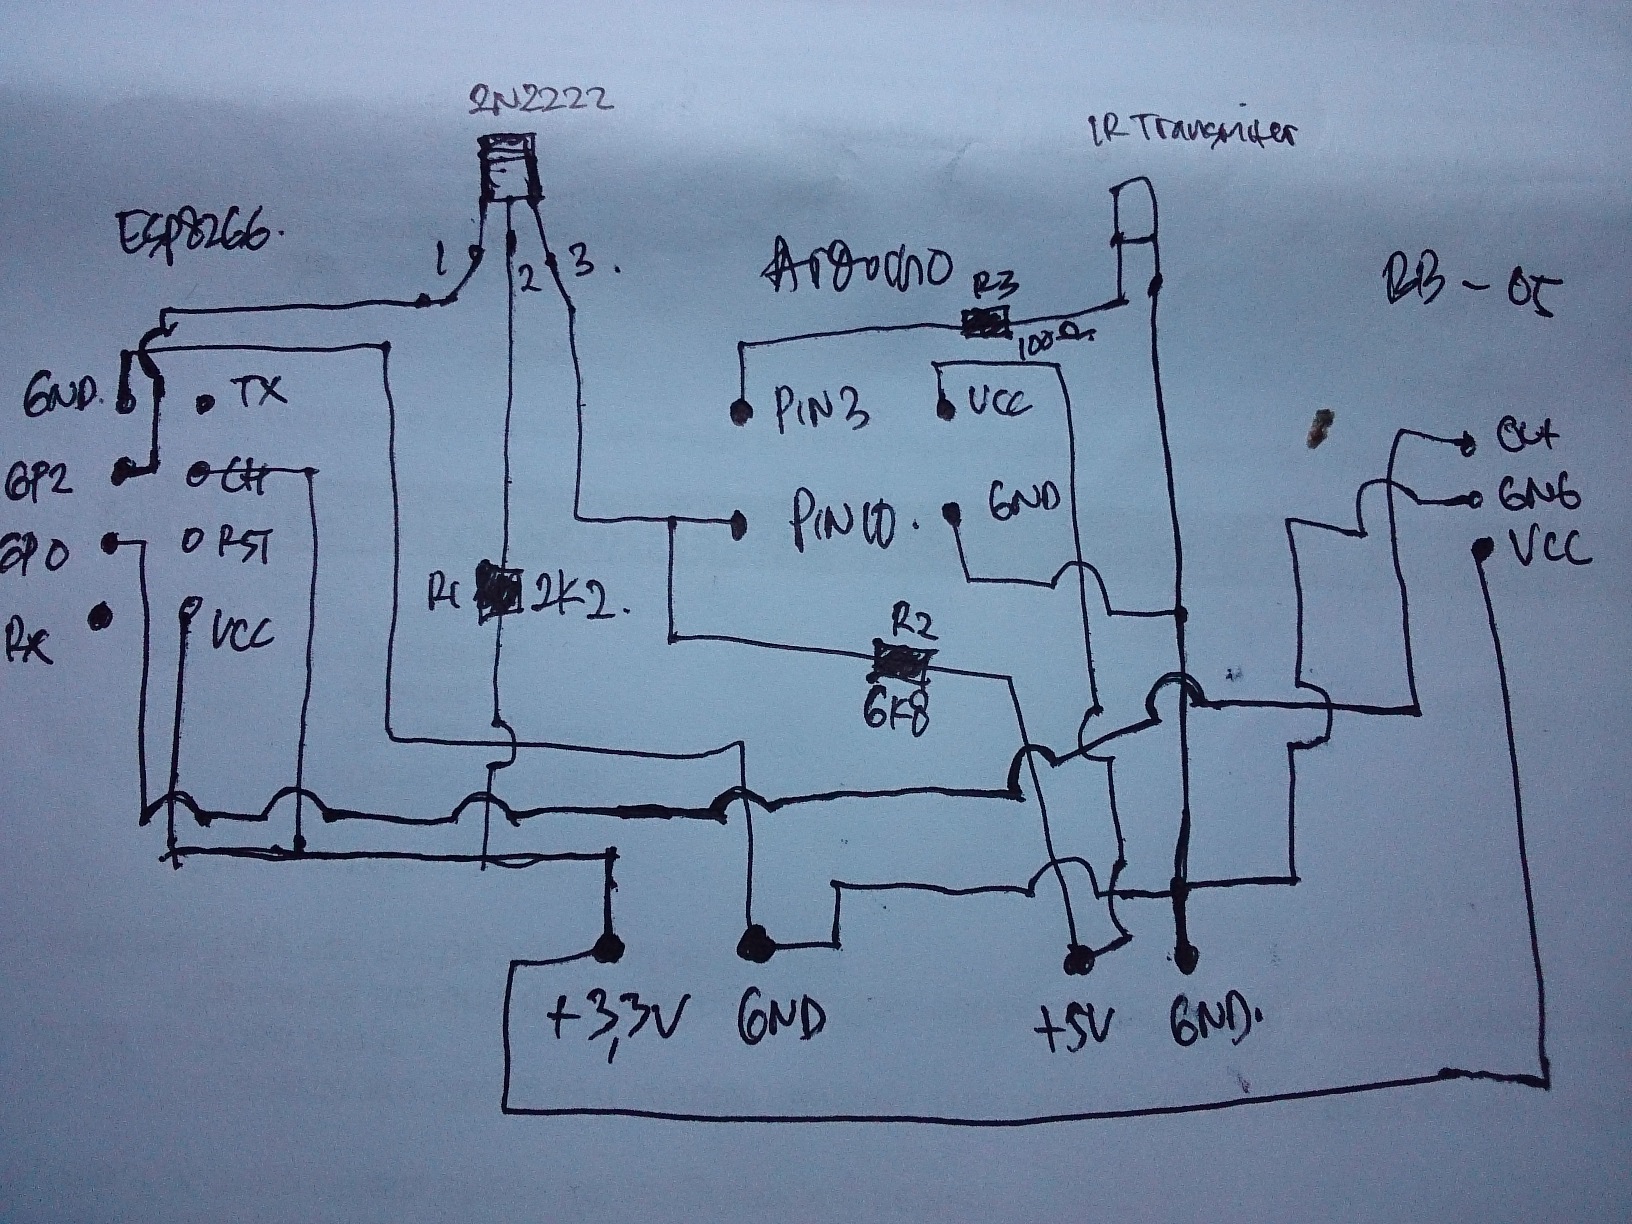
sorry for my hand draw for schema..hope you guys can see it
to Mr EasyIoT... please add web interface for this..
for power just give us DO for Power Button Only (no ON OFF)
for Volume and channel, AO without value (hide that number) and + - button (the val is 0 and 1).
maybe for channel we can have custom button that we can label it later for its own purpose, maybe for channel number, mute button etc...
thank you
the code still so messy..
i use arduino pro mini & esp8266..
in esp8266 i'm running Door/Windows sensor using bb-05 module, and the connection to EasyIoT server also inside esp8266
here is the code in esp8266 :
/*
  DigitalReadSerial
 Reads a digital input on pin 2, prints the result to the serial monitor

 This example code is in the public domain.
 */
#include <ESP8266WiFi.h>
#include <Base64.h>

// EasyIoT server definitions
#define ssid  "SSID"
#define password  "SSID password"
#define host "EasyIoT Server ip address"
#define port 80
#define node "your sensor node"
#define user "admin"
#define userpassword "test"

#define USER_PWD_LEN      40

char unameenc[USER_PWD_LEN];
// digital pin 2 has a pushbutton attached to it. Give it a name:
int digital = 0;

bool oldInputState;
//enable webserver o get data from EasyIoT server
WiFiServer server(80);

// the setup routine runs once when you press reset:
void setup() {
  // initialize serial communication at 9600 bits per second:
  Serial.begin(9600);
  delay(100);
  // initialize serial1 communication at 9600 bits per second:
  Serial1.begin(9600);
  delay(100);

  // make the DO BB-35 pin an input:
  pinMode(digital, INPUT);

  // Connect to WiFi network
  Serial.println();
  Serial.print("Connecting to ");
  Serial.println(ssid);

  wifiConnect();

  // Start the server
  server.begin();
  Serial.println("Server started");

  char uname[USER_PWD_LEN];
  String str = String(user)+":"+String(userpassword);
  str.toCharArray(uname, USER_PWD_LEN);
  memset(unameenc,0,sizeof(unameenc));
  base64_encode(unameenc, uname, strlen(uname));

  oldInputState = !digitalRead(digital);
}
// the loop routine runs over and over again forever:
void loop() {

  //so we just send the value only if it changes
  int inputState = digitalRead(digital);
  if (inputState != oldInputState){
    sendInputState(inputState);
    oldInputState = inputState;
  }

  // this is for EasyIoT Server
  // Check if a client has connected
  WiFiClient client1 = server.available();
  if (!client1) {
    return;
  }
  // Wait until the client sends some data
  Serial.println("new client");
  while(!client1.available()){
    delay(1);
  }

  // Read the request
  String req = client1.readStringUntil('\r');
  Serial.println(req);
  client1.flush();

  // send all value through serial1 to arduino
  String val;

    if (req == "1") //actually we dont need this
    val = "1";  //actually we dont need this
    if (req != "1") //actually we dont need this
    val = req;

    Serial1.println(val);
    Serial.println(val);

    client1.flush();

    Serial.println("Client disonnected");

    // The client will actually be disconnected
    // when the function returns and 'client' object is detroyed

}

void wifiConnect(){
    Serial.print("Connecting to AP");
    WiFi.begin(ssid, password);
    while (WiFi.status() != WL_CONNECTED) {

    delay(1000);
    Serial.print(".");
  }

  Serial.println("");
  Serial.println("WiFi connected");
  Serial.println(WiFi.localIP());
}

void sendInputState(bool inputState){
  // Use WiFiClient class to create TCP connections
  WiFiClient client;
  while(!client.connect(host, port)) {
    Serial.println("connection failed");
    wifiConnect();
  }
       String url = "";
       String command ="";

          if (inputState)
          command = "ControlOn";
          else
          command = "ControlOff";

  url = "/Api/EasyIoT/Control/Module/Virtual/"+ String(node) + "/"+command; // generate EasIoT server node URL

  Serial.print("POST data to URL: ");
  Serial.println(url);

  client.print(String("POST ") + url + " HTTP/1.1\r\n" +
               "Host: " + String(host) + "\r\n" +
               "Connection: close\r\n" +
               "Authorization: Basic " + unameenc + " \r\n" +
               "Content-Length: 0\r\n" +
               "\r\n");

    delay(100);
 // Read all the lines of the reply from server and print them to Serial
    while(client.available()){
    String line = client.readStringUntil('\r');
    Serial.print(line);
    }
  Serial.println();
  Serial.println("closing connection");

  // Repeat
  delay(100);        // delay in between reads for stability
}
once it connected, make a note of ts IP Address, we will need it for the automation code
and now the code inside arduino pro mini :
/*
 * IRremote: IRsendDemo - demonstrates sending IR codes with IRsend
 * An IR LED must be connected to Arduino PWM pin 3.
 * Version 0.1 July, 2009
 * Copyright 2009 Ken Shirriff
 * http://arcfn.com
 */

#include <IRremote.h>
#include <SoftwareSerial.h>
#define INPUT_SIZE 30

char s;

SoftwareSerial mySerial(10,11); //RX.TX

IRsend irsend;
int oldvalue = 0;
int oldchannel = 0;

void setup(){
  Serial.begin(9600);
  delay(100);
  mySerial.begin(9600);

}

void loop() {

// Get next value from Serial1 (add 1 for final 0)
char input[INPUT_SIZE + 1];
byte size = mySerial.readBytes(input, INPUT_SIZE);
// Add the final 0 to end the C string
input[size] = 0;

// Read each command pair
char* command = strtok(input, "&");
while (command != 0)
{
  // Split the command in two values
    char* separator = strchr(command, ':');
    if (separator != 0)
    {
        // Actually split the string in 2: replace ':' with 0
        *separator = 0;
        int remoteId = atoi(command);
        Serial.println("remoteId");
        Serial.println(remoteId);
        ++separator;
        int value = atoi(separator);
        Serial.println("Value");
        Serial.println(value);

        //dnow we are doing execution base on val we got
        if (remoteId == 1){
          if (value == 1)
        for (int i = 0; i < 3; i++) {
        Serial.println("Power");
        irsend.sendSAMSUNG(0xE0E040BF, 38); // Samsung TV power code
        delay(10);
        }
        }

          if (remoteId == 2){

              Serial.print("Value Vol =  ");
              Serial.println(value);

              Serial.print("OldVol =  ");
              Serial.println (oldvalue);

              if (value > oldvalue){
                int valp = (value - oldvalue);
                Serial.println(valp);

                for (int i = 0; i < valp; i++) {
                Serial.println("Volume +");
                irsend.sendSAMSUNG(0xE0E0E01F, 38); // Samsung TV v+ code
                oldvalue = value;
                Serial.print("OldVol =  ");
                Serial.println (oldvalue);
                delay(100);
                }
              }

                int valm = (oldvalue - value);
              if (value < oldvalue){
                for (int i = 0; i < valm; i++) {
                Serial.println("Volume -");
                irsend.sendSAMSUNG(0xE0E0D02F, 38); // Samsung TV v- code
                oldvalue = value;
                Serial.print("OldVol =  ");
                Serial.println (oldvalue);
                delay(100);
                }
              }
         }


              if (remoteId == 3){
                 if (value > oldchannel){
                 int valp = (value - oldchannel);
                    for (int i = 0; i < valp; i++) {
                    Serial.println("Channel +");
                    irsend.sendSAMSUNG(0xE0E048B7, 38); // Samsung TV channel+ code
                    oldchannel = value;
                    delay(100);
                    }
                 }

              int valm = (oldchannel - value);
              if (value < oldchannel){
                for (int i = 0; i < valm; i++) {
                Serial.println("Channel -");
                irsend.sendSAMSUNG(0xE0E008F7, 38); // Samsung TV channel- code
                oldchannel = value;
                delay(100);
                }
              }
              }
    }
        // Find the next command in input string
    command = strtok(0, "&");
  }
}
you must change the IRsend command according to your own TV/Sound/AC.. i was using IRREcvDump to see my irsend for samsung tv..
and now on EasyIoT server side..
add a virtual node for Door/Window sensor, set it as Door/window(DI)
add a virtual node for Power ON/Off TV, set it as Digital Output(DO)
add a virtual node for Volume TV, set it as Analog Output(AO)
add a virtual node for Channel TV, set it as Analog Output(AO)
i choose DO and AO because in current version of EasyIot server we still dont have the correct interface for TV Power, Volume and Channel.. so we use them for now until there is an update for them
Next we create automation for TV Power, Volume and Channel
here is the automation code for TV Power
const String ESP8266_IP_ADDRESS = "your esp IP Address";

const String MODULE_ADDRESS = "your node of TV Power";

public void Setup(){
  System.Diagnostics.Process.Start("CMD.exe","");
  EventHelper.ModuleChangedHandler((o, m, p) =>   {

    Console.WriteLine(m.Domain +" "+ m.Address + " in program id "+ Program.ProgramId.ToString()+ " property "+ p.Property + " value " + p.Value);


      if (m.Domain == "Virtual" && m.Address == MODULE_ADDRESS && p.Property == "Sensor.DigitalValue")

        sendCommand(p.Value);


        return true;

    });

}


/*

  This code is running periodicaly when program is enabled.

  Cron job detirmine running period.

*/

public void Run()

{

}


private void sendCommand(string value)

{

  sendToServer("1"+":"+"1"+"&");

}


private void sendToServer(String message)

{

  try

  {

  //Console.WriteLine("TCP client command:" + message);


   Int32 port = 80;

   System.Net.Sockets.TcpClient client = new System.Net.Sockets.TcpClient( ESP8266_IP_ADDRESS, port);

   Byte[] data = System.Text.Encoding.ASCII.GetBytes(message);

   System.Net.Sockets.NetworkStream stream = client.GetStream();

   stream.Write(data, 0, data.Length);

   // Close everything.

   stream.Close();

   client.Close();

  }

  catch(Exception e)

  {

    Console.WriteLine(e.StackTrace);

  }

}
this will send value of on/off to node as 1:1&, which mean 1 for id of power, : is separator, 1 is the value, and & the closing value..
here is the automation code for TV Volume
const String ESP8266_IP_ADDRESS = "your esp IP Address";

const String MODULE_ADDRESS = "your node of TV Volume";

public void Setup(){
  System.Diagnostics.Process.Start("CMD.exe","");
  EventHelper.ModuleChangedHandler((o, m, p) =>   {

    Console.WriteLine(m.Domain +" "+ m.Address + " in program id "+ Program.ProgramId.ToString()+ " property "+ p.Property + " value " + p.Value);


      if (m.Domain == "Virtual" && m.Address == MODULE_ADDRESS && p.Property == "Sensor.AnalogValue")

        sendCommand(p.Value);


        return true;

    });

}


/*

  This code is running periodicaly when program is enabled.

  Cron job detirmine running period.

*/

public void Run()

{

}


private void sendCommand(string value)

{

  sendToServer("2"+":"+value+"&");

}


private void sendToServer(String message)

{

  try

  {

  //Console.WriteLine("TCP client command:" + message);


   Int32 port = 80;

   System.Net.Sockets.TcpClient client = new System.Net.Sockets.TcpClient( ESP8266_IP_ADDRESS, port);

   Byte[] data = System.Text.Encoding.ASCII.GetBytes(message);

   System.Net.Sockets.NetworkStream stream = client.GetStream();

   stream.Write(data, 0, data.Length);

   // Close everything.

   stream.Close();

   client.Close();

  }

  catch(Exception e)

  {

    Console.WriteLine(e.StackTrace);

  }

}
same as TV Power code data sent, this will send value of Volume to node as 2:?&, which mean 2 for id of volume, : is separator, ? is the dynamic value according to interface slider, and & the closing value..
and last is Channel automation code, basically its just the same as volume automation code..
const String ESP8266_IP_ADDRESS = "your esp IP Address";

const String MODULE_ADDRESS = "your node of TV Volume";

public void Setup(){
  System.Diagnostics.Process.Start("CMD.exe","");
  EventHelper.ModuleChangedHandler((o, m, p) =>   {

    Console.WriteLine(m.Domain +" "+ m.Address + " in program id "+ Program.ProgramId.ToString()+ " property "+ p.Property + " value " + p.Value);


      if (m.Domain == "Virtual" && m.Address == MODULE_ADDRESS && p.Property == "Sensor.AnalogValue")

        sendCommand(p.Value);


        return true;

    });

}


/*

  This code is running periodicaly when program is enabled.

  Cron job detirmine running period.

*/

public void Run()

{

}


private void sendCommand(string value)

{

  sendToServer("3"+":"+value+"&");

}


private void sendToServer(String message)

{

  try

  {

  //Console.WriteLine("TCP client command:" + message);


   Int32 port = 80;

   System.Net.Sockets.TcpClient client = new System.Net.Sockets.TcpClient( ESP8266_IP_ADDRESS, port);

   Byte[] data = System.Text.Encoding.ASCII.GetBytes(message);

   System.Net.Sockets.NetworkStream stream = client.GetStream();

   stream.Write(data, 0, data.Length);

   // Close everything.

   stream.Close();

   client.Close();

  }

  catch(Exception e)

  {

    Console.WriteLine(e.StackTrace);

  }

}
but we change the id of the data we send..
because the lack of no feedback from the TV, the status of our interface will never be the same, example : perhaps the volume of the tv show us 10 but in our interface it show 13..
well then until we got the right web interface so this is will just do fine..
schematic..
sorry for my hand draw for schema..hope you guys can see it
to Mr EasyIoT... please add web interface for this..
for power just give us DO for Power Button Only (no ON OFF)
for Volume and channel, AO without value (hide that number) and + - button (the val is 0 and 1).
maybe for channel we can have custom button that we can label it later for its own purpose, maybe for channel number, mute button etc...
thank you
Last edit: 11 years 2 months ago by lesjaw.
Please Log in or Create an account to join the conversation.
10 years 9 months ago - 10 years 9 months ago #2306
by cdj
Replied by cdj on topic Infrared transmitter & Door/Window sensor
Hi, thanks for your work
excuse me where you connect GP0 of ESP8266? CLA? what is BB-OJ ?
Sorry read well the post, you use BB.-05...
What esp type u use?
When i try to compile esp code with arduino ide it respond me esp.ino:35:3: error: 'Serial1' was not declared in this scope
Ok i remove Serial1 and Serial1print....
when i start to check serial of Esp it respond me :
It connect to wi-fi network but doesn't connect to Raspberry EasyIot Server ?
And some other little questions :
What is System.Diagnostics.Process.Start("CMD.exe",""); ? Do you need to execute something from windows shell ???
Thanks a lot
DarioCdj
Sorry read well the post, you use BB.-05...
What esp type u use?
When i try to compile esp code with arduino ide it respond me esp.ino:35:3: error: 'Serial1' was not declared in this scope
Ok i remove Serial1 and Serial1print....
when i start to check serial of Esp it respond me :
Connecting to AP.....
WiFi connected
192.168.0.155
connection failed
Connecting to AP.....
WiFi connected
192.168.0.155
connection failed
.......
It connect to wi-fi network but doesn't connect to Raspberry EasyIot Server ?
And some other little questions :
What is System.Diagnostics.Process.Start("CMD.exe",""); ? Do you need to execute something from windows shell ???
Thanks a lot
DarioCdj
Last edit: 10 years 9 months ago by cdj.
The following user(s) said Thank You: sharonlei
Please Log in or Create an account to join the conversation.
Time to create page: 0.522 seconds
Forum latest
- No posts to display.