In this tutorial we will show how to control and read Raspberry Pi GPIO pins remotely in WEB interface or mobile application. No programming skills required.
Contents
3. EasyIoT Cloud configuration
Introduction
The Raspberry Pi is a tiny and affordable computer with GPIO interface. In this tutorial we will connect Raspberry Pi 3 with EasyIoT Cloud and control GPIO pins in WEB interface or mobile application. GPIO pins can be connected to relay modules and can be used to control different devices like lights, motors and so on. You can configure GPIO pin as digital input.
Raspberry Pi application is stored on Raspbian SD card image.
EasyIoT Cloud user interface.

Materials
-Raspberry Pi 3
| RASPBERRY PI 3 - Model B. 1GB RAM | |
$41.99  | |
$39.96  |
-SD card
| MICRO SD 64GB 32GB 16GB MEMORY CARD | |
| $11.35 | |
| $5.99 |
-Power supply
| 5V 2A Charger Micro USB | |
| $2.43 | |
| $3.40 |
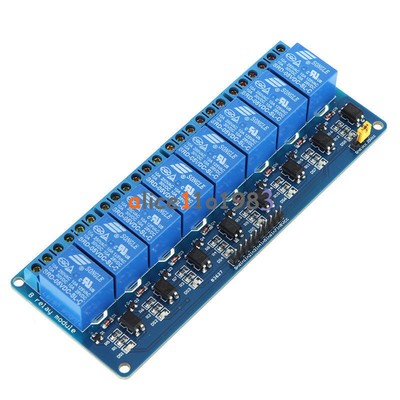
-Relay module
| 8 Channel 5V Relay Module With optocoupler | |
| $4.82 | |
| $4.20 |
-2N2222 NPN transistor
| 100Pcs NPN Transistor TO-92 2N2222 | |
| $1.01 | |
| $0.90 |
-5K resistor
| 400X 0.25w 1/4w Metal Film Resistor Pack Kit 1% 20 Value Each 20 Pcs 10 ~ 1M ohm | |
| $1.88 | |
| $5.50 |
-MB102 Breadboard
| MB102 Breadboard Power Supply Module 3.3V 5V Arduino Board+Breadboard 830 Point | |
| $3.12 | |
| $3.78 |
See buying guide at the end of tutorial.

EasyIoT Cloud configuration
Register to EasyIoT Cloud service and remember username and password. If there are pre-configured demo modules in user interface delete them.
Raspberry Pi 3 configuration
First go to download page and download EasyIoT Cloud Raspberry PI 3 Client image file. Image consist of Raspbian OS and EasyIoT Cloud client service to control GPIO.
Copy image to SD card. You can use dotNetDiskImager.exe or similar program to copy image to SD card. You need 8GB or bigger SD card. After copying pit SD card to Raspberry Pi 3 and connect it to power supply and network connected to internet.
Use keyboard and monitor or SSH access to login to Raspberry Pi 3. Default username is pi and password raspberry. After login go to nano editor to edit EasyIoT Cloud Username and password. In console enter:
sudo nano /usr/share/eiotclient/config/RPIConfig.xml
After editor is opened correct:
<Username>xxx</Username>
<Password>xxx</Password>
If you want change GPIO pin direction (Input/Output) you can also change this in XMLfile under Type. Posible entries are Input and Output
<GpioPin>
<Enabled>true</Enabled>
<ConnectorPin>Pin_P1_03</ConnectorPin>
<Type>Output</Type>
<GPIOResistor>OFF</GPIOResistor>
<GPIOPin>2</GPIOPin>
<ModuleId>2</ModuleId>
</GpioPin>
If you are using GPIO pin as input you can also configure GPIOResistor value to: OFF, PULL_UP or PULL_DOWN.
After you finish configuration close editor by pressing Crtl+X.
Reboot Raspberry Pi with command:
sudo reboot now
After reboot login to EasyIoT Cloud and you should see new modules with names Pin_P1_[pin number]. Pin numbers are displayed on following picture:

For example module with name Pin_P1_3 is GPIO2.
Later you can change pin name in EasyIoT Cloud interface under Configure->Modules to more appropriate name like "Light living room".
Additionally, if you want Raspberry to be connected to WiFi, configure WiFi adapter. In console enter:
sudo nano /etc/wpa_supplicant/wpa_supplicant.conf
and at the end of file add:
network={
ssid="Your_ESSID"
psk="Your_wifi_password"
}
and change "Your_ESSID" and "Your_wifi_password" password with yours. CLose editor with Ctrl+X and reboot Raspberry Pi.
Hardware
In our demo configuration GPIO output pin is connected to relay module:
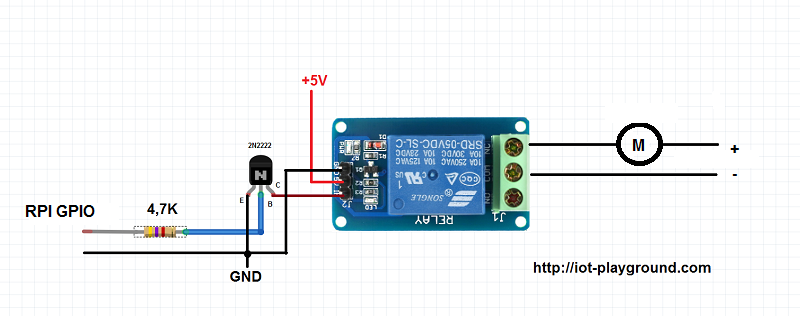
Input pin (Pin_P1_5 ) is configured with PULL_UP resistor. If you do not connect anything input is in high state (On). If you connect this pin to GND input state is OFF.
See more tutorials at http://iot-playground.com/build
Buying guide
To support this site and EasyIoT framework development please buy in our store.


Comments
RSS feed for comments to this post