In this tutorial we will show how to build plant irrigation system with ESP8266 Arduino library an EasyIoT server. With web interface we can control water pump and soil humidity remotely. Now you can go on holiday and irrigate plant with your phone.
Irrigation system features:
- remotely controlled water pump
- automatic / manual mode
- humidity and water pump status display
Irrigation can be triggered in WEB user interface. It this case pump will start for 10s. You can also use automatic mode. In this case you set threshold soil humidity in WEB interface. If soil humidity drops below this value pump will switch on for 5s. After 10 min will again check soil moisture and switch pump on if needed.
Materials
-Custom ESP8288 Arduino board with ESP-01 interface ( or standard Arduino board + relay modue)
-ESP8266 module
| ESP8266 ESP-01 Serial WIFI Wireless Transceiver Module | |
$2.11  | |
$17.00  |
-water pump
| DC 3-9V Spray Pumping Motor | |
| $3.53 | |
| $6.74 |
-soil moisture sensor module
| Soil Humidity Hygrometer Moisture Detection Sensor | |
| $1.03 | |
| $0.71 |
-regulator module 0-30V
| Step-Down Adjustable Converter Power Module Regulator LM2596 | |
| $0.99 | |
| $3.19 |
-12V power supply
| 12V 1A/2A Transformer Travel Power Supply Adapter US EU UK Plug | |
| $1.38 | |
| $3.23 |
See buying guide at the end of tutorial.

Build
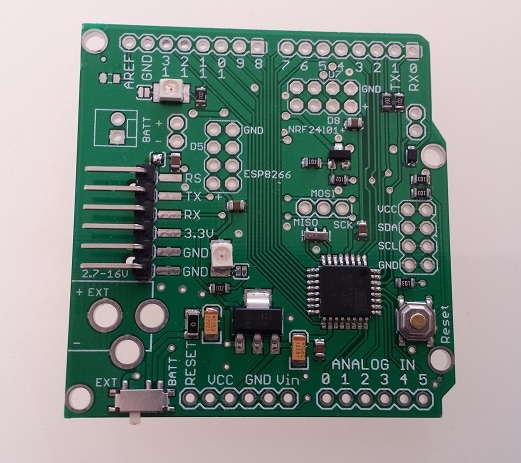
In our case we use custom Arduino board with ESP-01 interface. It uses Atmega328 at 8Mhz. Good thing about this board is that 3.3V regulator, ESP-01 interface and MOSFET are on board. It's very suitable for ESP8266 projects. Datasheet for custom board can be found here. Custom board is produced in EU, so shipping time is faster than for orders in China.
Be sure to use correct firmware version for ESP8266 module. See ESP8266 firmware flashing tutorial for details.

If you do not own this board you can use any other Arduino board, but you will need additional relay module to control water pump. In later case read ESP8266 Arduino connection tutorial to connect ESP8166 to Arduino.
Custom Arduino board is suitable for EasyIoT ESP8266 Arduino library. The only thing I'm missing is reset pin connected to one Arduino DO pin. This can be solved with one short wire between digital pin 2 and reset pin on ESP8266. Board has by default solder jumpers for serial connection between ESP8266 and Arduino HW ports. In my case I want to debug program so I keep solder jumpers unconnected and added two wires to DO pins (10 and 11) for software serial. Voltage power for board is between 5 and 12V.

Humidity sensor is standard soil moisture module. We will use module analog output connected to A0 on Arduino board. Power supply for module is 3.3V connected with 3.3V power supply on custom board.
To control water pump we will use on board MOSFET transistor. Simply connect one motor wire to custom board and other motor wire to 4.5V power supply. You can use step down adjustable regulator. If you do not have custom board use relay module.


Program
Program can be found on our GitHub. You do not need special adjustments, just set server IP, AP username and password in Esp8266EasyIoTConfig.h.
EasyIoT server configuration
In WEB user interface just add irrigation system under ESP8266 EasyIoT drivers. See tutorial how to add module. If you done everything correctly you should see something like this. Name modules like on picture below.


If you enable data logging for soil humidity you can also see chart with history values.
See more tutorials at http://iot-playground.com/build
Buying guide
To support this site and EasyIoT framework development please buy in our store.


Comments
Can you please tell me what changes if I use an Arduino Uno board instead of that one you used?
Thanks!
Did you check debug output?
Please join forum for more questions...
I'm trying to do same with LightLevel and Roller shutter control.
Great Tutorial how combine Arduino with EasyIoT to pass AUTO mode and Light Level treshold
RSS feed for comments to this post