In this tutorial we will show how to build WiFi light sensor. We will use ESP8266 and LDR (light dependent resistor) and connect to EasyIoT Cloud. Sensor is plug and play. ESP8266 Arduino IDE will be used to upload program to ESP8266.
This project is suitable for beginners, because it consist of only 3 components. Sensor is plug and play - it automatically registers to EasyIoT Cloud.
Contents
3. EasyIoT Cloud configuration
Introduction
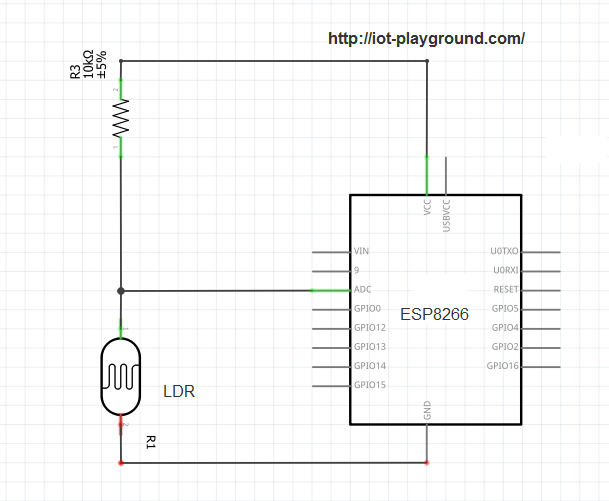
For light sensor we will use LDR - Light Dependent Resistor. LDR is a light-controlled variable resistor. The resistance of a photoresistor decreases with increasing incident light intensity; in other words, it exhibits photoconductivity. It will be connected in series with resistor. One side of LDR is connected to ground, other to resistor and other side of resistor is connected to 3.3V. Voltage in LDR and resistor connection is dependent on light on LDR resistor. ESP8266 will be used to measure this voltage and send it to EasyIoT Cloud.


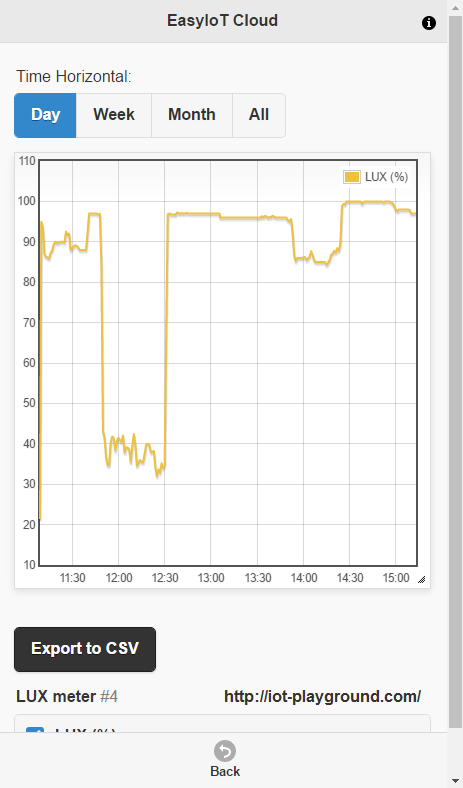
ESP8266 light sensor module in EasyIoT Cloud interface.
Materials
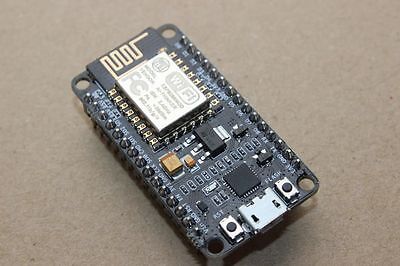
-ESP8266 WiFi module
| ESP8266 Lua Nodemcu WIFI Network Development Board | |
$7.43  | |
$2.65  |
-Resistor 10K
| 400X 0.25w 1/4w Metal Film Resistor Pack Kit 1% 20 Value Each 20 Pcs 10 ~ 1M ohm | |
| $1.88 | |
| $5.50 |
-LDR Photoresistor
| 20 pcs Photoresistor | |
| $0.99 | |
| $0.84 |
-5V Power supply
| 5V 2A Charger Micro USB | |
| $2.43 | |
| $3.40 |
See buying guide at the end of tutorial for details.
EasyIoT Cloud configuration
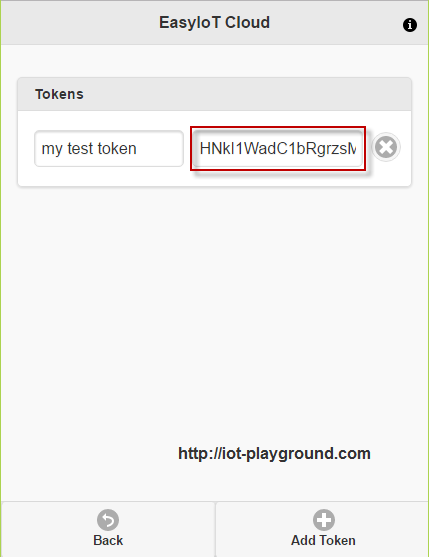
No EasyIoT Cloud configuration is needed, just register to EasyIoT Cloud service. After registration go to Configuration->Tokens And press button Add token. Remember Token - you will need it to modify program.
Program
Program is written in Arduino ESP8266 IDE. See Arduino ESP8266 IDE tutorial how to connect ESP8266 module to computer to upload program. You will also need ESP8266 EasyIoT Cloud REST API V1 library.
Program is available at GitHub.
In program change AP name and password and token:
#define AP_USERNAME "xxx"
#define AP_PASSWORD "xxx"
#define TOKEN "xxx"
Program at beginning reads setting in EEPROM. If module ID is 0 this means module is not added to EasyIoT Cloud. In this case module is added to EasyIoT Cloud, adds parameters and change module type. Then it reads voltage on analog pin and sends to EasyIoT Cloud.
Hardware
In our case we use ESP8266 NodeMCU, but you can use any other ESP8266 with AI. Just connect 10K resistor and LDR to 3.3V and GND. Resistor and LDR connection connect to ESP8266 analog input.
See more tutorials at http://iot-playground.com/build
Buying guide
To support this site and EasyIoT framework development please buy in our store.