In this tutorial we will show how to program ESP8266 directly in Arduino IDE. That's how we will get Arduino simplicity and power of ESP8266. In tihs case we do not need Arduino, just ESP8266 module. For start we will create blink example.
We can program ESP8266 native code or use ESP8266 NodeMCU. But there is better way. Recently there was released ESP8266 Arduino IDE. Thanks to guys behind this great work.
EDIT: updated manual is available at Arduino ESP8266 IDE.
See more tutorials at http://iot-playground.com/build
Materials
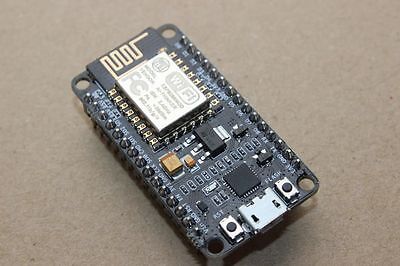
-ESP8266 module
| ESP8266 ESP-01 Serial WIFI Wireless Transceiver Module | |
$2.11  |
| ESP8266 ESP-03 Serial WIFI Wireless Transceiver Module | |
| $2.07 |
| ESP8266 ESP-12 Serial WIFI Wireless Transceiver Module | |
| $2.06 |
| ESP8266 ESP-05 Serial WIFI Wireless Transceiver Module | |
| $1.88 |
| ESP8266 ESP-07 Serial WIFI Wireless Transceiver Module | |
| $2.18 |
-FT232RL FTDI USB to TTL Serial Adapter
| FT232RL FTDI USB to TTL Serial Adapter 5V, 3.3V | |
| $2.59 |
-1K resistor
| 400X 0.25w 1/4w Metal Film Resistor Pack Kit 1% 20 Value Each 20 Pcs 10 ~ 1M ohm | |
| $1.88 |
-LED diode
| 100PCS 3mm Red Round LED Bright Light-Emitting Diodes | |
| $1.67 |
Program
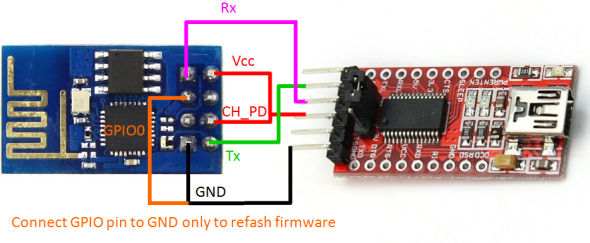
First we download ESP8266 Arduino IDE. Latest version can be found on GitHub. Just download latest version and unpack it in Arduino ESP folder on your computer. Run Arduino.exe. Before we start programming we connect ESP8266 module to our computer. Connection is similar as if update firmware on ESP8266. For programming we need need FT232RL FTDI USB to TTL Serial+Adapter. Set FTDI programmer to 3.3V. See buying guide for details.
Warning: Some versions of FT232 USB serial adapters do not provide enough current for ESP8266. In this case use external 3.3V power supply connected to ESP8266 only.
Next we need to change some settings in Arduino IDE. Select right COM port (Tools->Port), set programmer (Tools->Programmer->esptool)
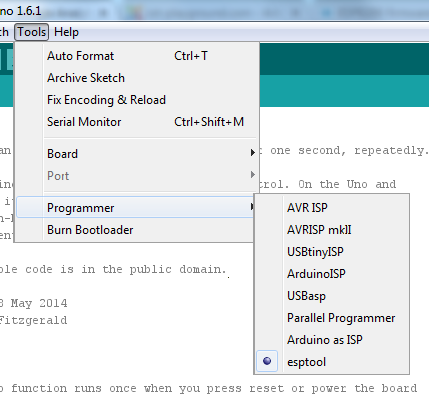
and board (Tools->Board->Generic ESP8266 board).

Now we can load program. Basically this is standard Blink example program. Because we will use ESP8266 instead of Arduino we change pin number in standard program. Replace pin 13 with pin 2 which is PIN02 in ESP8266 GPIO.
Here is modified program. It can be also downloaded on GitHub.
When you modify program just press upload button. If everything is correct program will compile and upload to ESP8266 module. After you finish programming disconnect GND wire on GPIO0.
Connection
To see our blink example working connect LED and 1K resistor to GPIO2 pin. On picture below VCC connection to CH_PD is missing - add also this wire.

In next post we will show how to build sensor with Arduino IDE.
See more tutorials at http://iot-playground.com/build
Buying guide
To support this site and EasyIoT framework development please buy in our store.


Comments
use modified Arduino Ide
https://github.com/esp8266/arduino
For more questions please join community forum.
It's work! I changed the FTDI module. Thank you, very much!
I do, but no esptool either with the "autoinstall". But I found a ready to use installation in "release" section that include esptool. Now, I'm stuck by programming step.
I have this message when I try to program the esp8862:
Quote:Thank for your help
Aha, they changed installation. Now you install board in standard Arduino IDE. Follow installation instructions on their GitHub.
Yes, I downloaded the IDE from GitHub. But I haven't found the arduino.exe. So, I unpacked the .zip folder from GitHub to an arduino installation. The esp8862 board type appeared in Tools menu. But not the esptool programmer. I don't understand why.
Do you use Arduino IDE from GitHub and not standard Arduino IDE?
I tried your solution, but i haven't found the esptool programmer. Any idea?
Thank you.
RSS feed for comments to this post